React Error Boundaries: The Underused Key to Resilient UIs
TL;DR: React Error Boundaries are a powerful yet underutilized feature that can save your app from the dreaded "white screen of death." They let you catch crashes in one part of the UI and gracefully degrade (show a fallback UI) without breaking the entire app. In production, this means better user experience, fewer outages, and actionable error logs for developers. It’s shocking how many codebases overlook error boundaries – this deep dive will remind you why they’re crucial for production-ready React apps and how to leverage them effectively.
What Are Error Boundaries?
Error Boundaries are React components that act like a safety net for your application’s UI. In essence, they are React’s equivalent of a try/catch block for component rendering errors. An error boundary can catch JavaScript errors anywhere in its child component tree, log those errors, and display a fallback UI instead of the broken component tree. This prevents a runtime error in one part of the app from crashing the entire app.
React introduced error boundaries in version 16 with a clear goal: “A JavaScript error in a part of the UI shouldn’t break the whole app.” Before error boundaries, an uncaught error deep in the component tree could corrupt React’s internal state and blank out the entire UI. Now, if an error is thrown during rendering (or in a lifecycle method or constructor) of a component, it “bubbles up” to the nearest error boundary. The boundary then catches the error and renders a fallback interface (like an error message), instead of letting the error tear down the whole React component tree.
To clarify, error boundaries catch render-time errors in React components – e.g. an error thrown in a component’s render(), constructor, or lifecycle (like componentDidMount). They do not catch all errors in your app (more on these limitations later). But for the errors they do catch, they can prevent catastrophic UI failures. In fact, since React 16, any error that isn’t caught by an error boundary will unmount the entire app from the DOM by default. React’s creators decided that showing a corrupted UI was worse than showing nothing at all in such cases. This default behavior underscores how essential error boundaries are – without them, one uncaught exception means a full application outage on the client.
Why Error Boundaries Matter (and Why You Should Care)
Think of the last time you visited a website or web app and suddenly everything went blank. 🥴 It’s a frustrating experience and immediately erodes trust in the app. Error boundaries exist to avoid those scenarios by enabling graceful degradation. Here are the key benefits of using error boundaries in your React applications:
Prevent “White Screen of Death”: Without error boundaries, a minor bug (even something like reading an undefined property in a deep child component) can blank out your entire app UI. With a boundary in place, the error is contained and other parts of the UI continue to function normally. In other words, one broken widget won’t take down your whole app.
Better User Experience (UX): Instead of a blank page or broken UI, users see a graceful fallback UI for the faulty component. This could be a friendly error message, or alternate content. The app remains responsive, and critical features (navigation, other sections) still work. A good fallback might say “Oops, something went wrong here. You can try again later.” – signaling that the issue is isolated. This keeps users engaged and reassured even when part of the app fails. For example, in an e-commerce app, if the recommendations panel crashes, an error boundary could show a placeholder message there while the user can still browse products and complete purchases – avoiding confusion like “Did my order go through or did the whole site crash?”. blog.sentry.ioblog.sentry.io
Resilience and Graceful Degradation: Error boundaries make your UI more resilient. Your app can fail gracefully instead of catastrophically. Critical workflows can often continue despite non-critical components failing. Facebook has noted that in Messenger, they wrap different UI sections (sidebar, chat log, message input, etc.) in separate error boundaries – so if one section crashes, the rest remain interactive. This compartmentalization is a best practice for robust apps.
Preserving App State: In many cases, containing an error to one part of the UI means users don’t lose their overall session or data. For instance, if an error boundary on one tab of a dashboard catches an error, other tabs or the overall state (in Redux or Context, etc.) can remain intact. The user might not even need to refresh the page; they could navigate to a different section that still works.
Developer Visibility (Observability): When an error boundary catches an error, it gives you an opportunity to log the error details to a monitoring service. This is huge for observability – you get to know something went wrong (and where) instead of the error dying silently in the client. You can instrument boundaries to report errors (with stack traces and component info) to systems like Sentry, New Relic, Datadog, etc. We'll discuss this more shortly, but suffice it to say that error boundaries are also a conduit for telemetry about crashes. Without them, a crash might just fail in the user’s browser with no trace for you as a developer.
In summary, Error Boundaries drastically improve reliability and user trust in your application. They turn mystery crashes into contained, manageable issues. It’s surprising that despite these benefits, many teams either omit error boundaries or only use a single global boundary without fully leveraging them. Let’s visualize the difference an error boundary makes:
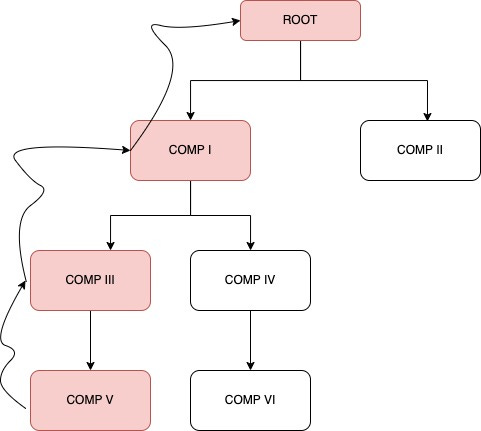
Figure: Without an error boundary, an error in a deep child component (here “COMP V”) propagates up the React tree (red nodes) and causes the entire app (up to the root) to crash and unmount. The result is a blank screen – the user loses all UI.
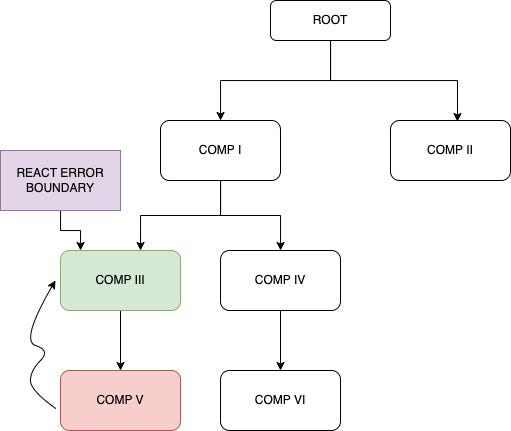
Figure: With an error boundary wrapping “COMP III”, an error in its child (“COMP V”) is caught. The error boundary intercepts the error and renders a fallback UI for that subtree (green node), preventing the error from affecting ancestor components. The rest of the app (ROOT, COMP I, COMP II, etc.) remains alive and usable. Only the failing component’s area shows an error message instead of crashing the whole page.
As you can see, error boundaries isolate failures. Users can continue interacting with the parts of the app that didn’t crash. This resilience is a hallmark of production-ready web apps. Next, let’s discuss how to implement error boundaries in React and apply them in your projects.
Implementing an Error Boundary (Basic Example)
Error boundaries in React are implemented using class components. Specifically, a class component becomes an error boundary if it defines either (or both) of these lifecycle methods:
static getDerivedStateFromError(error): Used to update the component’s state when an error is encountered. Typically, you use this to set some flag likehasErrorin state to trigger a fallback UI on the next render.componentDidCatch(error, info): Used to perform side-effects on error, such as logging the error to an external service. This method receives two arguments: theerrorthat was thrown, and aninfoobject with details like the component stack trace (i.e., which component tree path the error occurred in).
Only class components can be true error boundaries because hooks (as of now) don’t support catching render errors. If you’re working with functional components, you can still use error boundaries by wrapping a class ErrorBoundary around your function components. (There are also libraries that provide alternatives – more on that shortly.)
Here’s a minimal example of an Error Boundary component:
import React from 'react';

class ErrorBoundary extends React.Component {
  constructor(props) {
    super(props);
    this.state = { hasError: false };
  }

  static getDerivedStateFromError(error) {
    // Update state so the next render shows the fallback UI
    return { hasError: true };
  }

  componentDidCatch(error, errorInfo) {
    // Log the error to an error reporting service
    console.error("Error caught by ErrorBoundary:", error, errorInfo);
    // You could send errorInfo.componentStack to your monitoring service here
    logErrorToMyService(error, errorInfo);  // pseudo-function
  }

  render() {
    if (this.state.hasError) {
      // Fallback UI when an error is caught
      return <h2>Something went wrong.</h2>;
    }

    // Otherwise, render children normally
    return this.props.children;
  }
}
In this example, if any child of ErrorBoundary throws an error during rendering, getDerivedStateFromError sets hasError to true, causing the fallback UI ("Something went wrong." message) to render instead of the children. Meanwhile, componentDidCatch logs the error (here we just console.error and call a fictitious logErrorToMyService). You would replace that with an integration to your logging/monitoring tool of choice.
Using the Error Boundary is as simple as wrapping parts of your JSX with it:
<ErrorBoundary>
  <MyWidget />  {/* This is a child component that might throw errors */}
</ErrorBoundary>
Now, if MyWidget fails during render, the error boundary will catch it, and MyWidget’s area of the UI will be replaced by the fallback UI defined in ErrorBoundary.render(). The rest of the page outside ErrorBoundary is unaffected.
A few implementation notes:
Reusability: You typically create one ErrorBoundary class (like the above) and reuse it throughout your app. It can accept props like a custom fallback UI element, so you could do
<ErrorBoundary fallback={<CustomErrorUI />}>. In our simple example, the fallback is hardcoded in render, but you can make it flexible.Only Catches Children: An error boundary will catch errors in its descendant components. It won’t catch errors thrown inside itself. So, keep the fallback UI simple and robust – the boundary’s own rendering should be unlikely to throw errors. If an error boundary itself throws an error while rendering its fallback, that error will bubble to the next parent error boundary (if any). In practice, avoid anything in the fallback that could itself crash (no complex logic there).
Class vs Functional: As of React 19, there’s no built-in way to make a functional component act as an error boundary (this may change in the future, but not yet). This is one of the rare cases where even modern React apps still need a class component. However, you can absolutely use error boundaries with function components – just use a class boundary to wrap them. If you prefer hooks, libraries like
react-error-boundaryprovide a hook (useErrorBoundaryoruseErrorHandler) and a ready-made ErrorBoundary component to use in functional components. For example,react-error-boundaryby Brian Vaughn lets you do:
import { ErrorBoundary, useErrorHandler } from 'react-error-boundary';

<ErrorBoundary fallback={<FallbackComponent />} onReset={resetHandler}>
  <MyComponent />
</ErrorBoundary>
This library adds niceties like an
onResetprop to reset the error state (e.g., if the user clicks “Retry”) and auseErrorHandlerhook to trigger an error boundary from inside a functional component. But even without it, the vanilla approach shown earlier works fine.
Now that we know how to create an error boundary, let's talk about where and when to use them for maximum effect.
Best Practices: Where to Place Error Boundaries
It’s tempting to just wrap your entire application in one giant ErrorBoundary and call it a day. While you should have a top-level boundary, optimal use of error boundaries is more nuanced. The granularity of error boundaries is up to you – you can wrap big portions of the app, or very small ones. Here are some best practices from experience and the React team’s guidance:
At Least One Global Boundary: Every application should have at least one error boundary near the root (for example, wrapping your whole
<App />or the routing outlet). This catches any error not handled elsewhere, ensuring the user never sees a blank screen with no UI at all. The global boundary can show a generic “App crashed” message or even a reload button. Its other job is to report the error (so your team gets notified – more on that soon). Think of the global boundary as a safety net under all others.Per Page or Section Boundaries: For larger apps, especially ones with multiple routes or distinct sections, consider wrapping each page or major UI section in an error boundary. For example, if your app has a main navigation with various pages (dashboard, settings, profile, etc.), you could wrap the content of each page in an ErrorBoundary. This way, if one page’s content crashes, the user can still use the navigation to go elsewhere. They won’t be completely kicked out of the app. In contrast, a single top-level boundary that covers the whole app might catch the error but then often you’d have to reload the app to continue – more disruptive to the user.
Wrap Risky Components or Features: Identify parts of your app that are more prone to errors or have less critical importance, and isolate them with error boundaries. Examples:
Third-party UI components or widgets that might throw exceptions.
Experimental features or legacy code that isn’t as robust.
Components that render user-generated content (which might be unpredictable).
Components that perform data fetching or heavy computations during render. If a data fetch fails and the component throws an error, a boundary can catch it and show an error state for that component only.
Lazy-loaded chunks (via
React.lazyandSuspense): If the code split fails to load or has an initialization error, an error boundary can catch that. (In fact, error boundaries work hand-in-hand with Suspense to handle component load errors, but we’ll avoid a deep dive into Suspense here.)
Multiple Layers of Boundaries: You can nest error boundaries. For example, a top-level boundary for the whole app, plus a boundary around a specific feature, plus perhaps even an inner boundary around a particularly fragile child of that feature. When nested, the nearest boundary to the error catches it. This means you can have a general fallback at a high level, but a more specific fallback for a specific component. Facebook’s Messenger example is a good case: separate boundaries for sidebar, message log, input, etc., so that each section can fail independently.
Designing Fallback UIs: Put some thought into what the user sees when an error happens. A generic “Something went wrong” might suffice for a global boundary, but for more contained boundaries you might tailor the message. e.g., if a chart component fails to render, your error boundary’s fallback could say, “⚠️ Failed to load this chart.” and maybe offer a retry button. Fallback UI should be informative but not overly technical (you can log technical details silently). It’s also wise to ensure the fallback UI fits in with your app’s look (so it doesn’t appear jarring). Keep fallback components simple to avoid introducing new errors.
Reset and Recovery: In some cases, you can allow the user to recover from an error without a full page refresh. For example, providing a “Retry” action in the fallback that attempts to re-render the component (perhaps by resetting some state or using a key to remount it). The
react-error-boundarylibrary supports aresetKeysprop: if those keys change, it resets the error boundary’s state. You can implement similar logic manually by clearing the error-inducing state or unmounting/remounting the component. This is an advanced UX consideration – not always applicable – but worth noting if you want to make certain parts of your app self-healing after a failure.
In practice, deciding boundary placement comes down to how isolated you want errors to be. Wrapping everything in one boundary = simple, but any error brings down the whole UI (albeit with a nicer message than a crash). Using many fine-grained boundaries = more resilience, but slightly more complexity (and a bit of performance overhead, though usually negligible). A common compromise: a top-level boundary plus one boundary per major page/feature. That way, the app stays up if a minor feature breaks, and only the affected section reloads or shows an error.
Finally, be mindful that error boundaries do not replace other error handling; they complement it. You should still handle expected errors (like validation errors, network errors) within the components if possible and only rely on error boundaries for unexpected exceptions. We’ll cover what error boundaries don’t catch next.
Don’t Forget Observability: Logging Errors for Monitoring
Catching an error is only half the battle – the other half is knowing that it happened and diagnosing it. In a production app, you want to log errors to a central service for monitoring (often called Real User Monitoring or error tracking). Error boundaries are the perfect place to hook into your logging/monitoring pipeline.
When an error boundary’s componentDidCatch fires, you get the error and a special info object (which contains a component stack trace – essentially the hierarchy of React components where the error happened). You should use this to send an error report to your monitoring service. For example, in the earlier code snippet we had logErrorToMyService(error, errorInfo). In a real app, that could be:
Sentry: using Sentry’s browser SDK, you might call
Sentry.captureException(error, { extra: errorInfo }). Sentry even provides a pre-built<ErrorBoundary>component you can use (as noted by some devs who wrap their app inSentry.ErrorBoundary).Datadog RUM: Datadog’s Real User Monitoring SDK allows you to call
datadogRum.addError(error). In fact, Datadog’s docs show an example of instrumenting React error boundaries by sending a new Error with the React component stack attached, like so:
componentDidCatch(error, info) {
  const renderingError = new Error(error.message);
  renderingError.name = "ReactRenderingError";
  renderingError.stack = info.componentStack;  // include the React component stack trace
  datadogRum.addError(renderingError);
}
This way, the error reported to Datadog will include the component stack (unminified, if you uploaded source maps) for easier debugging.
New Relic: New Relic’s Browser agent can capture unhandled errors by default, but to log handled exceptions (like those caught by boundaries) you might use their API (e.g.,
newrelic.noticeError(error)) incomponentDidCatch. Check New Relic’s docs for specifics, but it’s a similar idea – record the error with relevant context.Custom Logging: If you’re not using a third-party service, you could also send error details to your own backend (perhaps an endpoint that collects client errors) or even just
console.errorin development.
The point is to never silently swallow errors. An error boundary giving a user-friendly UI is great for UX, but you (the developer) still need to know that something went wrong under the hood. The React team explicitly encourages using error reporting services so you can learn about uncaught exceptions in production and fix them. As part of your observability strategy, make sure every componentDidCatch calls out to some logging mechanism. This gives you error stacks, component names, maybe even user info or app state, to help reproduce and squash the bug.
Also, consider logging an identifier or additional context to correlate the error with what the user was doing. For example, log which route was active, or the user ID, or any feature flags, etc., that might help debugging. Many monitoring tools let you attach such context.
Telemetry Example: Suppose you integrated Datadog RUM. If a component deep in your app throws, your error boundary might capture it and report it as a “ReactRenderingError” with the component stack. When you later inspect Datadog’s error tracking, you’d see an error entry with type "ReactRenderingError", the message, and the React component stack trace (unminified class/function names) showing e.g. App > DashboardPage > ReportsPanel > ChartComponent – so you immediately know where to look in code. Without the boundary, that error might have either been unreported or at best reported as a generic uncaught error with no component context.
To drive this home: integrating error boundaries with monitoring is a hallmark of a mature, production-ready React app. It turns runtime errors from mysterious user complaints into actionable alerts for the engineering team.
Limits of Error Boundaries (What They Don’t Catch)
Error boundaries are wonderful, but it’s important to know their boundaries (pun intended). By design, there are several types of errors they cannot catch:
Errors in Event Handlers: If a user clicks a button and an error happens inside an onClick handler, that error won’t be caught by an error boundary. This is because event handlers run outside the rendering lifecycle. You should use regular
try/catchin event handlers or promise.catchfor async events. The good news is an error in an event handler won’t crash the whole app (React treats event handlers like any JS call stack – it won’t unmount your app). But you might still want to handle or log such errors manually.Asynchronous Errors: Similarly, errors that occur in asynchronous callbacks (e.g. in a
setTimeout,requestAnimationFrame, or a Promise that rejects after the render) won’t be caught. For example, if you dofetch('/api/data').then(...).catch(err => { throw err }), that throw happens asynchronously, so the boundary won’t see it. Instead, handle rejections with a.catch()and perhaps trigger component state to reflect the error. (There is a pattern where you throw a Promise or error in a render method to integrate with Suspense or error boundaries, but that’s a controlled trick, not a typical uncaught async error.)Server-Side Rendering (SSR): Error boundaries don’t work on the server side. If a React component throws while rendering on the server (e.g., using
react-dom/server), there is no error boundary to catch it on the server – it’ll just throw. You have to handle such errors in your server rendering pipeline. Once the HTML is generated and sent to the client, and React hydrates, then the client-side error boundaries take over for errors in client interactions.Errors within the Error Boundary itself: As mentioned, if the ErrorBoundary component (during its rendering of fallback, or in
componentDidCatchitself) throws an error, it cannot catch its own error. This will bubble up to the next error boundary above (if any). The takeaway: keep your error boundary implementations simple and robust. For example, don’t try to do complex data fetching or state updates in the fallback UI that could fail. The boundary’s job is to catch and report, and show a failsafe UI – limit it to that.Intentional Abort Errors (with no Error): This is an edge case, but if a component intentionally unmounts or aborts rendering without throwing an actual Error (for instance, using a pattern that doesn’t use exceptions), an error boundary wouldn’t fire. However, such patterns are rare – most often, a render failure comes with an exception.
To handle things that error boundaries can’t catch:
Use try/catch in synchronous event handlers or logic outside React’s render. (Though an uncaught error in an event handler won’t crash the app, you may still want to catch it to, say, show a toast notification or log it).
Use promise
.catchfor async operations (or globally handle unhandled promise rejections).For SSR, use a wrapper around your
ReactDOMServer.renderToStringto catch errors and show an error page or message on the server-rendered HTML if needed.Consider using
window.onerrororwindow.onunhandledrejectionas a global safety net to log errors that escape React’s boundaries (though again, they won’t prevent the error – just report it).
Understanding these limitations ensures you don’t misapply error boundaries. They are not a blanket replacement for all error handling – they specifically guard your rendering process. When used as intended, they greatly fortify the UI against unhandled exceptions.
Conclusion: Embrace Error Boundaries for Robust React Apps
It’s 2025, and React’s error boundaries have been around for several years – yet many codebases and engineers haven’t fully embraced them. As we’ve explored, error boundaries can mean the difference between an app that crashes at the first unexpected bug and one that bends without breaking, delivering a better experience under duress. In high-stakes production apps, this can save you from costly downtime, user frustration, and lost trust.
To recap, error boundaries let you catch UI crashes, show fallback content, and report errors for fixing. They are easy to implement (just a few lines of code for a basic version) and have minimal performance cost. There’s really no excuse – if you’re building a serious React application, you should use them proactively!
Some parting recommendations:
Audit your app: Check if you have at least a top-level
<ErrorBoundary>in place. If not, add one – even a basic one is better than none. React will otherwise unmount your whole app on an uncaught error.Think granular: Identify critical pathways where isolating errors would help. Wrap key components or sections with their own boundaries so that one failure doesn’t derail everything else.
Log everything: Hook your boundaries into your logging/monitoring. It’s a one-time setup that pays dividends every time an error occurs by alerting you with details.
Test your fallbacks: Simulate errors (you can manually throw in a component to test) to see what the user experience is. Ensure the fallback UIs are user-friendly. It’s better for you to be “shocked” by how it looks in testing than your users in production.
Stay updated: Keep an eye on React’s future improvements. The core team has discussed adding a hook for error boundaries; when that comes, it may make usage even easier in function components. For now, the patterns in this article will serve you well.
In a world where frontend complexity is ever-growing, error boundaries are a cornerstone of robustness for React apps. By catching the unforeseen and preventing total meltdowns, they let your application fail with grace instead of chaos. It’s time to give this underused feature the attention it deserves. Go ahead – adopt error boundaries wholeheartedly, and encourage your peers to do the same. Your users (and your future self debugging a production issue at 3 AM) will thank you for it. 🚀